Reimbursement Configuration
This chapter explains how to configure reimbursement forms. A reimbursement form defines what employees can claim, what information they must provide, how the document number is generated, and who needs to approve the request.
Use this chapter after you have completed the initial setup in the previous chapter. Positions, users, roles, expense categories, and custom fields should already be prepared before you configure approval rules.
In this chapter, keep these two terms separate:
- Expense Category is the master data used in reimbursement detail rows.
- Reimbursement Form is the form being configured on this page.
When To Use Reimbursement Forms
Create separate reimbursement forms when different claim types need different rules, fields, numbering, or instructions.
Common examples:
| Form | Typical Use |
|---|---|
| General Claim | Daily operational expenses such as meals, parking, or office supplies. |
| Travel Claim | Business trip expenses that require receipts, invoice attachments, or trip details. |
| Medical Claim | Medical reimbursements that may need specific supporting documents. |
| Project Claim | Project-related expenses that need a project code or client name. |
A form can be active or inactive. Active forms appear when employees create reimbursements. Inactive forms are kept for history or future use, but employees cannot use them for new submissions.
Form Priority In The Create Menu
The reimbursement form list has a Priority column.
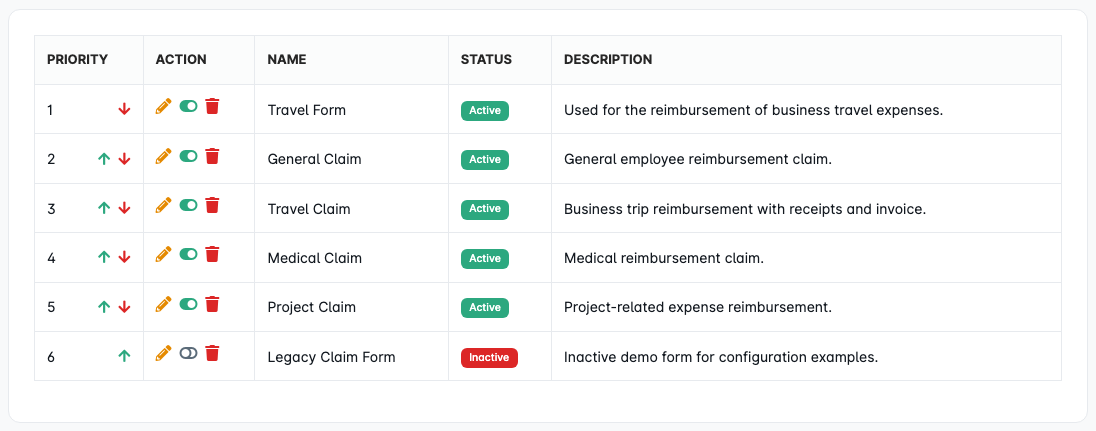
Form priority controls the display order of forms in the employee's Create Reimbursement menu.
| Priority Behavior | Meaning |
|---|---|
| Smaller number | Appears higher in the create reimbursement menu. |
| Larger number | Appears lower in the create reimbursement menu. |
| Inactive form | Does not appear for new submissions, even if it has a priority number. |
Use the up and down arrows in the priority column to reorder forms. Click Save Priority after changing the order.
Recommended practice:
- Put the most commonly used forms near the top.
- Put specialized forms lower in the list.
- Deactivate old forms instead of relying on a low priority to hide them.
Open A Reimbursement Form
- Open Configuration > Reimbursement Forms.
- Choose the form you want to configure.
- Click the Edit icon.
The form configuration page has three tabs:
| Tab | Purpose |
|---|---|
| Reimbursement Forms | Basic form settings, access rights, behavior flags, and document numbering. |
| Approval Rules | Rules that decide who approves reimbursements submitted through this form. |
| Instructions | Guidance text shown to employees before they submit the form. |
1. General Form Settings
Open the Reimbursement Forms tab.
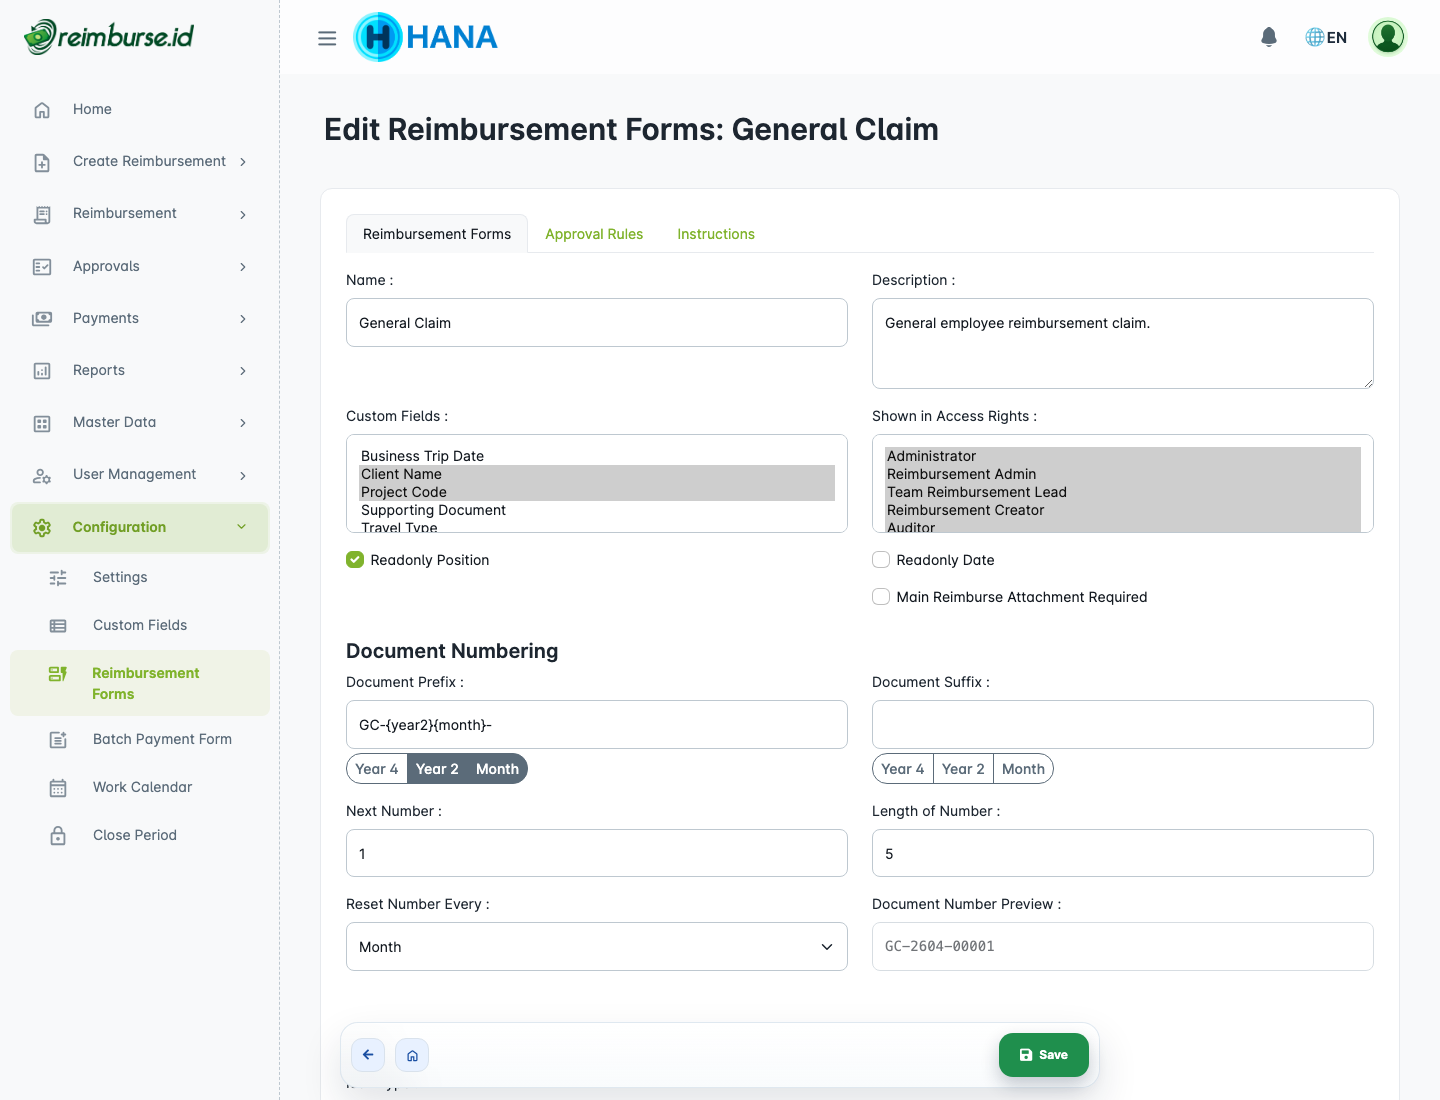
This tab controls the identity and behavior of the form.
| Setting | What It Does |
|---|---|
| Name | The form name shown to employees. Use a clear name such as General Claim or Travel Claim. |
| Description | A short explanation that helps employees choose the correct form. |
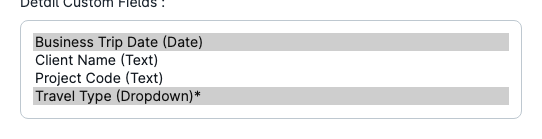
| Custom Fields | Extra fields from the custom field library that should appear on this form. |
| Detail Custom Fields | Extra fields that should appear inside each reimbursement detail row. |
| Print Template | The reimbursement print template linked to this form. |
| Shown in Access Rights | Roles that are allowed to see and use this form. |
| Icon | The icon shown in the create reimbursement menu. |
| Active / Inactive | Whether this form can be used for new reimbursement submissions. |
Access Rights
Use Shown in Access Rights to control which roles can submit this form.
Examples:
| Requirement | Suggested Setup |
|---|---|
| All employees may use the form. | Include the employee roles that should create reimbursements. |
| Only the payment team may use the form. | Include payment-related roles only. |
| A form is no longer used. | Set the form to inactive instead of removing role access one by one. |
If an employee cannot see a form in the create reimbursement menu, check both of these items:
- The form must be active.
- The employee's role must be included in the form access rights.
Header Custom Fields Vs Detail Custom Fields
Use the two custom-field areas for different purposes:
| Area | Best For |
|---|---|
| Custom Fields | Information that belongs to the reimbursement header, such as project name, event code, or trip purpose. |
| Detail Custom Fields | Information that belongs to each expense line, such as receipt date, merchant, route, or per-line reference. |
Choose Custom Fields when the value should be filled once per document. Choose Detail Custom Fields when the value may be different on each expense line.
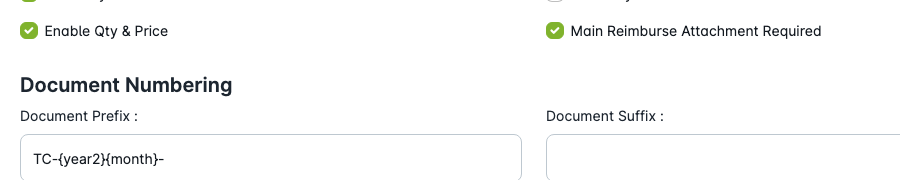
Form Behavior Flags
Behavior flags control how the form behaves when an employee creates a reimbursement.
| Flag | Meaning |
|---|---|
| Readonly Position | The system uses the employee's current position and prevents manual changes. This keeps approval routing consistent. |
| Readonly Date | The system uses the current date and prevents manual date changes. This is useful when backdated claims are not allowed. |
| Main Reimburse Attachment Required | The employee must upload at least one main attachment before submitting, such as a receipt or invoice. |
| Enable Qty & Price | Each detail line uses qty and price instead of one amount field. |
Recommended setup:
- Keep Readonly Position enabled when your approval rules use Supervisor or PIC Top Position.
- Enable Main Reimburse Attachment Required for forms that always require receipts.
- Use Readonly Date only when employees should not choose a transaction date manually.
- Enable Qty & Price when the claim type usually needs quantity-based calculation, such as mileage, nights stayed, item count, or unit-based purchases.
Print Template Assignment
Use Print Template when this reimbursement form needs its own print layout.

Important behavior:
- One print template can be used by several reimbursement forms.
- The form decides which print template is used when employees print documents created from that form.
- If no print template is selected, the system uses the default reimbursement print layout.
Print Builder
Print Templates are created in Configuration → Print Templates → Reimbursement Print and then linked back to the reimbursement form from this page.

The print builder uses a simple layout structure:
- Sections group major parts of the document.
- Rows and columns control how content is arranged inside a section.
- Blocks define what appears in the printed output.
Common blocks:
| Block | Typical Use |
|---|---|
| Heading | Main document title or section title. |
| Paragraph | Static notes or explanatory text. |
| Label & Value | Standard reimbursement fields, custom fields, requestor fields, or date fields. |
| Details Table | Expense line breakdown. |
| Attachments List | Attachment descriptions and previews. |
| Approvals and Signatures | Approval stages, actors, and timestamps. |
| Company Logo | Company branding at the top of the printed document when needed. |
How to configure a print template for a reimbursement form:
- Open Configuration → Print Templates → Reimbursement Print.
- Create a new template or edit an existing one.
- Add sections, rows, and blocks.
- Use preview to check the printed layout, and select a sample reimbursement when available.
- Save the template.
- Return to Configuration → Reimbursement Forms.
- Open the reimbursement form.
- Select the template in Print Template.
- Save the form.
What Label & Value Can Show
Inside the print builder, Label & Value can be used for:
- standard reimbursement fields,
- header custom fields,
- requestor custom fields,
- date fields with a specific print format.
If the selected field has no value in a reimbursement document, the printed label can still appear while the value stays empty. This is expected behavior and helps keep the layout consistent.
Print-Specific Settings
Important print-template behavior for administrators:
- Date fields in Label & Value can use a special print format instead of the company default.
- Inactive templates are not intended for new assignment to reimbursement forms.
- Changes to a template affect the printed output of reimbursement forms that use that template.
Common Print Builder Problems
| Problem | What To Check |
|---|---|
| A selected field prints with an empty value. | The reimbursement may not have a value for that field. Check the document data and the field mapping in the template. |
| The printed output still looks like the old layout. | The reimbursement form may still be using the default fallback print because no template is assigned. |
| Preview and printed output do not look the same. | Check which sample reimbursement is used in preview and confirm the reimbursement form is using the expected template. |
| The template does not appear in the reimbursement form. | Check whether the template is inactive or whether the user has permission to manage print templates. |
2. Document Numbering
Document numbering controls the reimbursement number generated for each submission through this form.
| Setting | Purpose |
|---|---|
| Document Prefix | Text or variables added before the running number. |
| Document Suffix | Text or variables added after the running number. |
| Next Number | The next running number that will be used. |
| Length of Number | The total digits in the running number. For example, length 5 creates 00001. |
| Reset Number Every | Defines whether the running number continues, resets monthly, or resets yearly. |
| Document Number Preview | Shows an example of the generated number before you save. |
You can insert dynamic date variables into the prefix or suffix:
| Variable | Meaning | Example |
|---|---|---|
{year4} | Current year in 4 digits. | 2026 |
{year2} | Current year in 2 digits. | 26 |
{month} | Current month in 2 digits. | 04 |
Example configuration:
| Setting | Value |
|---|---|
| Document Prefix | GC-{year2}{month}- |
| Length of Number | 5 |
| Document Suffix | empty |
| Reset Number Every | Month |
Example generated number:
GC-2604-00001Recommended practice:
- Use a short prefix that represents the form, such as
GC-for General Claim orTRV-for Travel Claim. - Include
{year2}{month}when the payment team wants numbers grouped by period. - Check the preview before saving.
- Avoid changing numbering after the form has been used unless the payment team has approved the change.
3. Instructions
Open the Instructions tab.
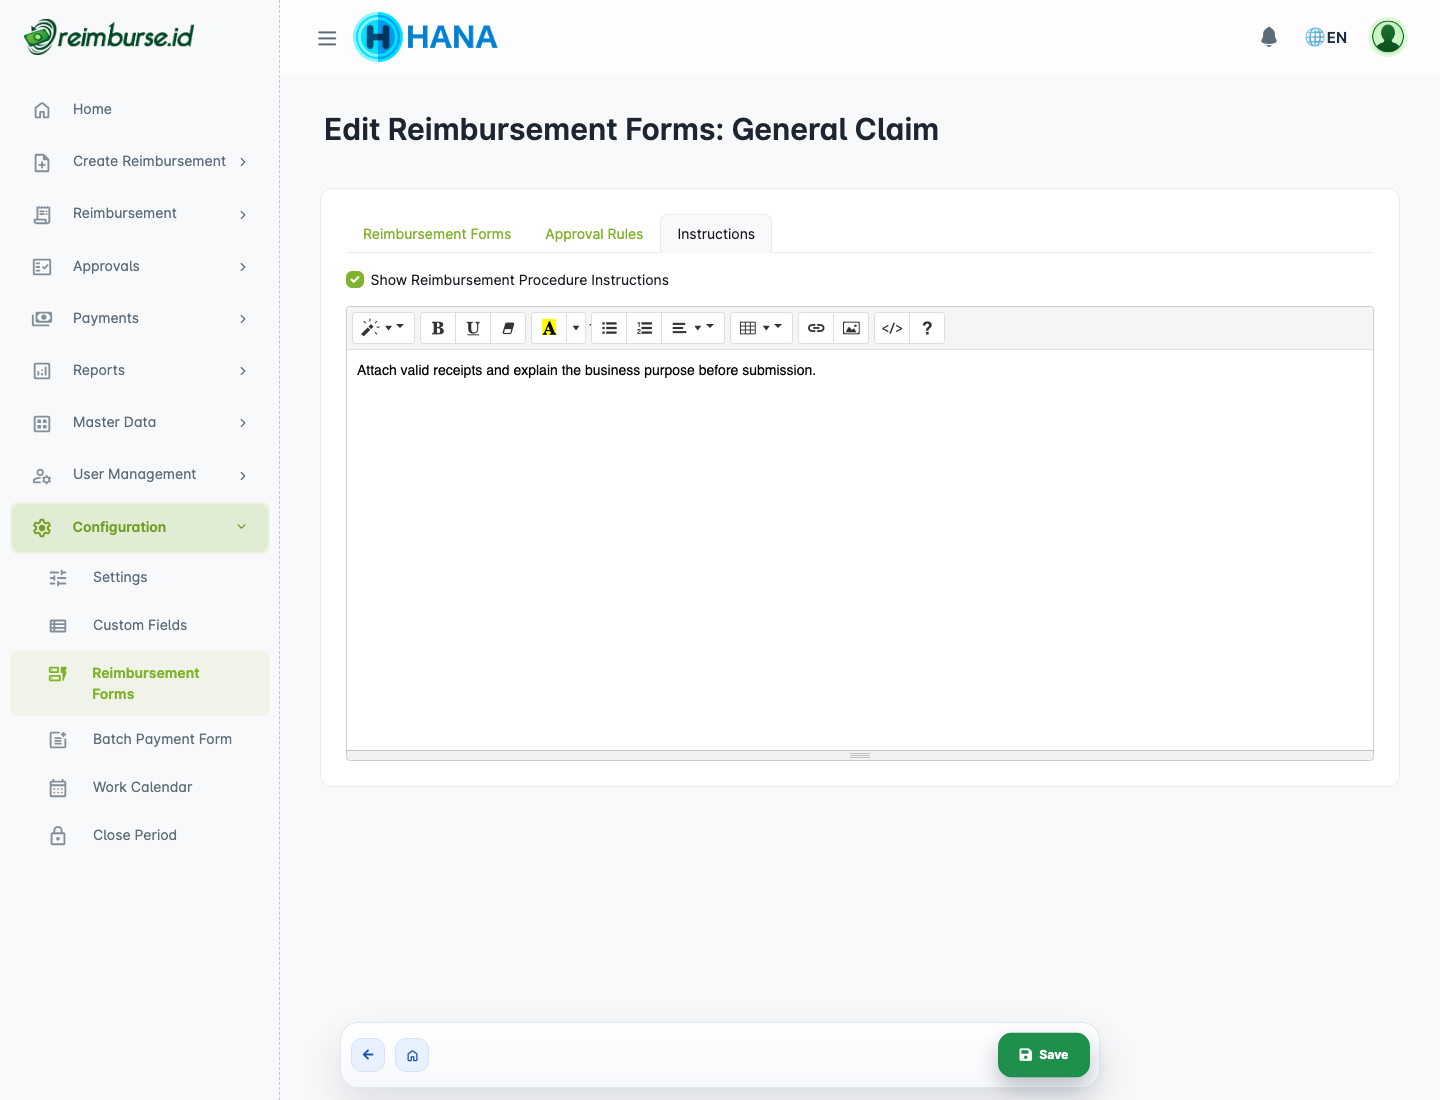
Instructions are shown to employees before they submit the reimbursement. Use this area for short, practical guidance.
Examples:
| Use Case | Example Instruction |
|---|---|
| Receipt requirement | Attach a valid receipt and make sure the amount is readable. |
| Business purpose | Explain the business purpose before submitting. |
| Travel claim | Attach hotel invoices, transportation receipts, and trip approval if required. |
| Deadline | Submit claims before the monthly closing date. |
| Attachment descriptions | Add a meaningful file description when one reimbursement can contain several similar receipts or invoices. |
How to enable instructions:
- Open the Instructions tab.
- Enable Show Reimbursement Procedure Instructions.
- Write the instruction text in the editor.
- Click Save.
Keep instructions short. Long policy documents are better stored outside the form and linked from the instruction text.
When instructions are enabled, employees will see an instruction icon next to the form name on the Create Reimbursement page. Clicking the icon opens the instruction content before they submit the reimbursement. See Reimbursement User Guide for the employee view.
4. Approval Rules
Open the Approval Rules tab.
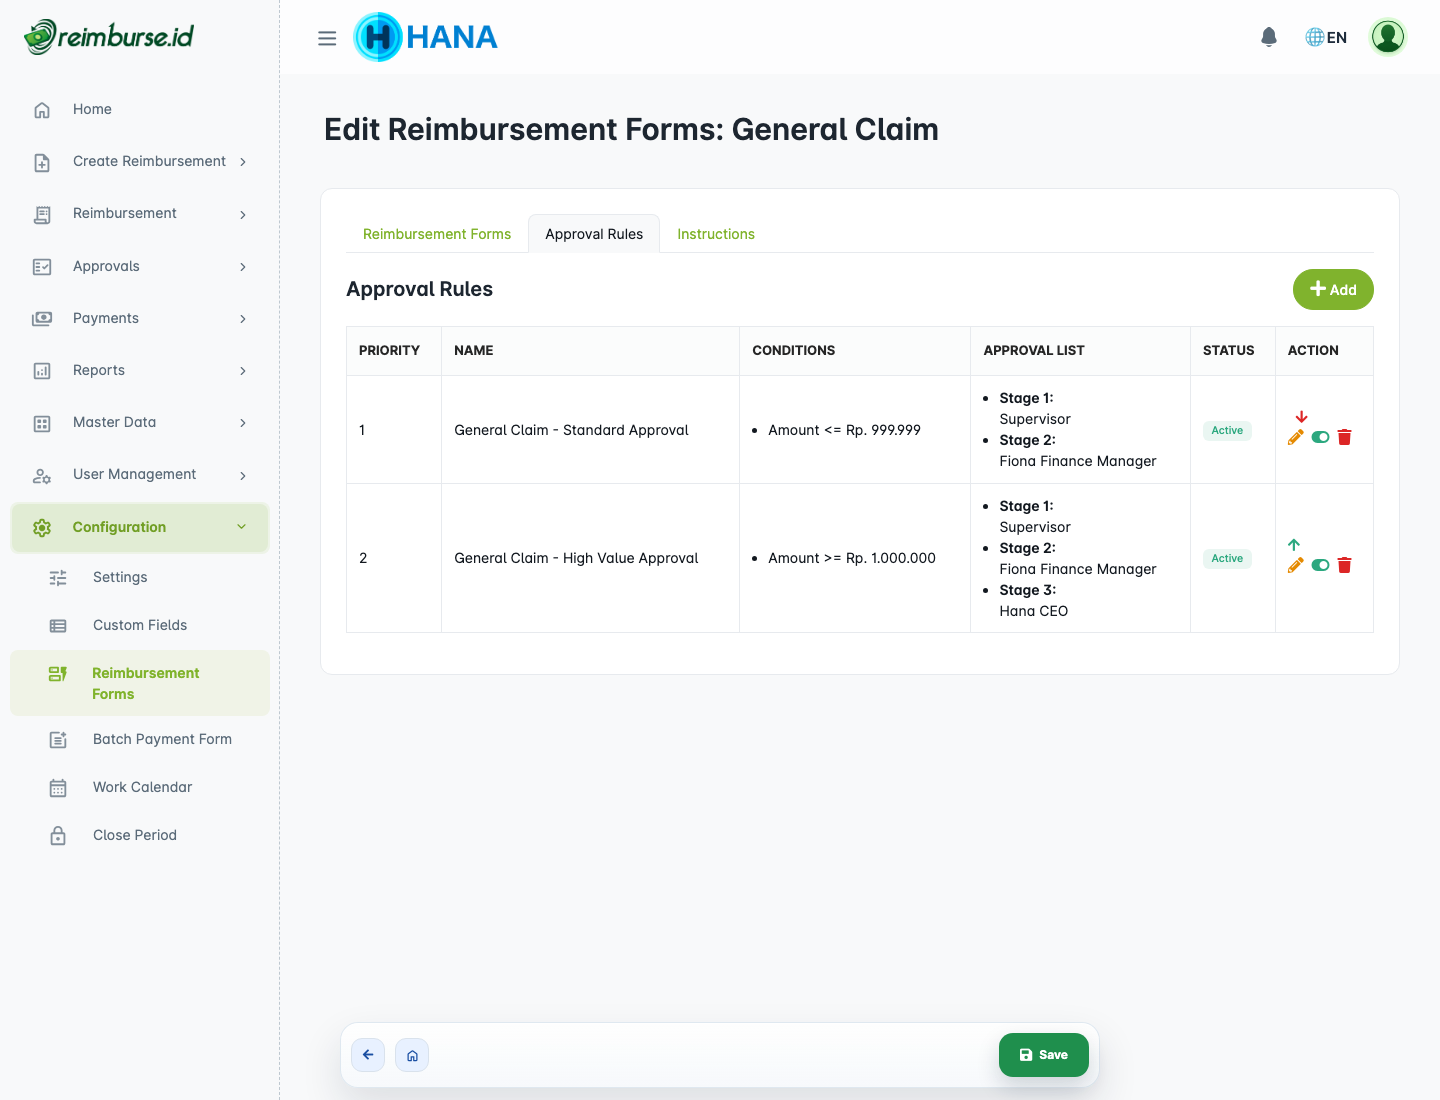
Approval rules define who must approve reimbursements submitted through this form. Each rule has two parts:
| Part | Meaning |
|---|---|
| IF | The condition that decides when the rule applies. |
| THEN | The list of approvers who must approve the reimbursement. |
Click Add to create a new rule.
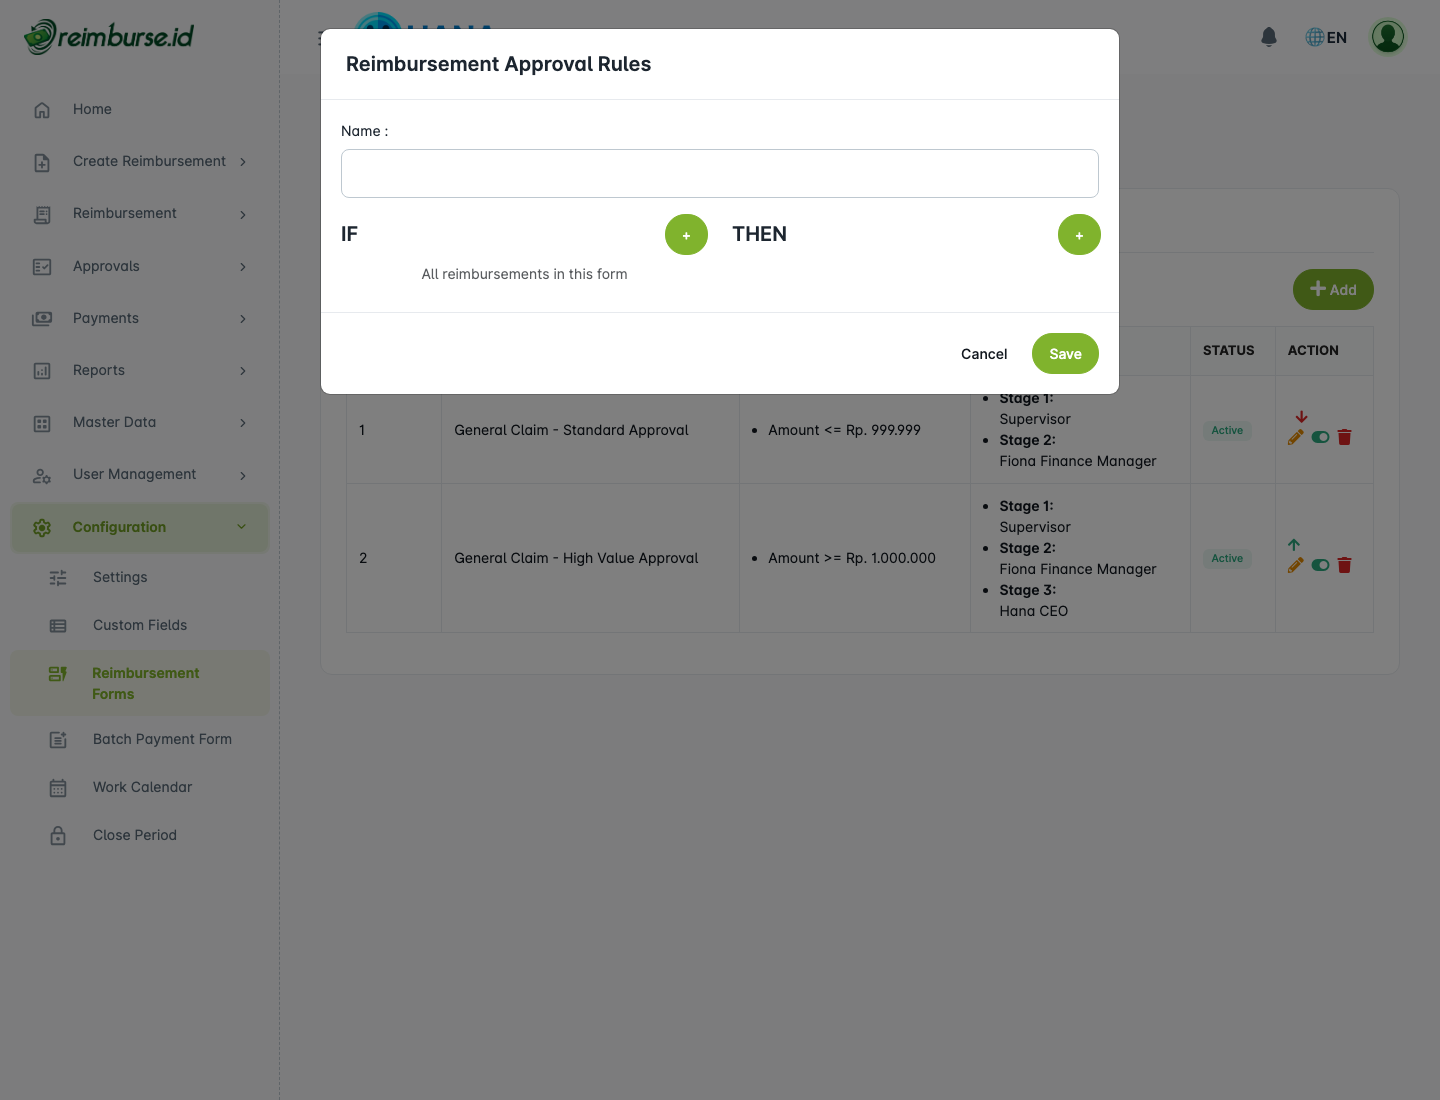
IF Conditions
A rule can apply to all reimbursements or only to reimbursements that match specific conditions.
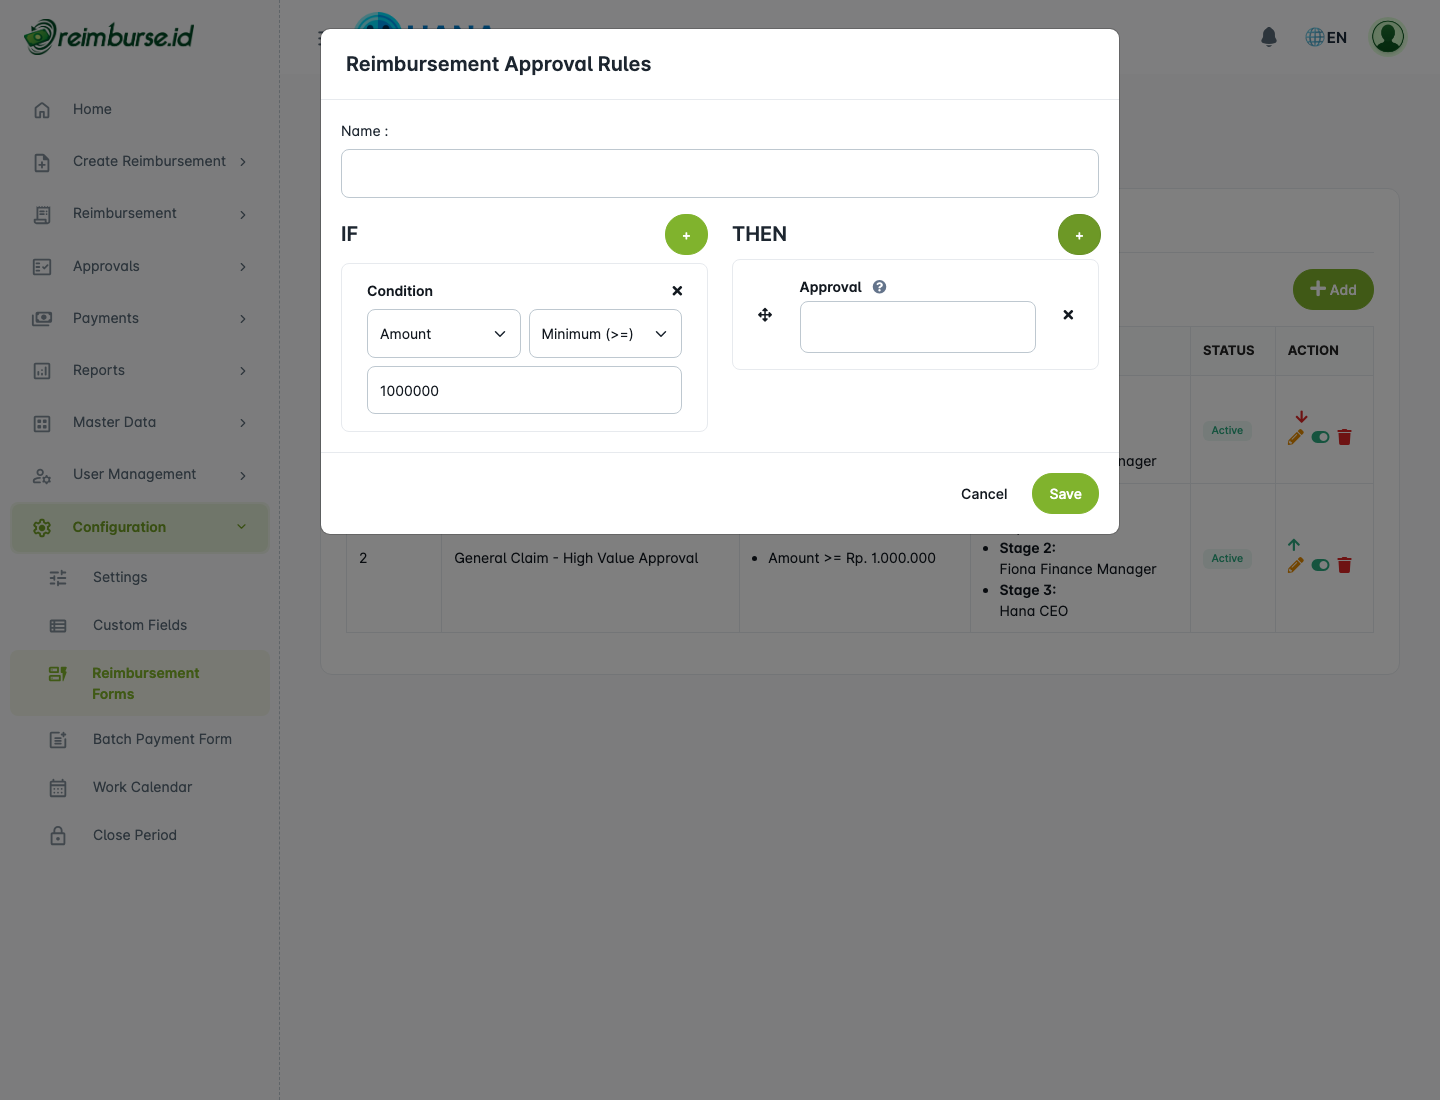
Common condition examples:
| Condition | Example |
|---|---|
| Total Amount | Apply only when the total amount is greater than Rp 1.000.000. |
| Custom Field | Apply only when Project Type is Internal. |
| Position | Apply only when the submitter is in a selected position branch. |
How to add a condition:
- Click the + button in the IF area.
- Select the condition type, such as Amount, Position, Description, or a custom field.
- Select the operator, such as minimum, maximum, equal, contains, or in.
- Fill in the value when the selected condition requires one.
- Add another condition only when the rule needs more than one requirement.
If no condition is added, the rule applies to all reimbursements in this form.
If multiple conditions are added to the same rule, all conditions must be met before the rule is used. In other words, conditions inside one rule use AND logic.
THEN Approvers
Approvers are evaluated in order. The first approver must approve before the next approver receives the document.
| Approver Type | How It Works |
|---|---|
| Supervisor | Uses the PIC of the position directly above the submitter's position. |
| PIC Top Position | Uses the PIC assigned to the highest-level position in the submitter's position branch. |
| User | Uses a specific named user, regardless of the submitter's position. |
Before using Supervisor or PIC Top Position, make sure Master Data > Position has the correct hierarchy and PIC assignments.
5. Example Approval Scenario
This example uses two rules for a General Claim form.
Business policy:
| Claim Amount | Approval Flow |
|---|---|
| Up to Rp 1.000.000 | Supervisor approval. |
| Above Rp 1.000.000 | Supervisor approval, then Finance Manager approval. |
Recommended rule order:
| Priority | Rule | IF | THEN |
|---|---|---|---|
| 1 | High Amount Claim | Total Amount greater than Rp 1.000.000 | Supervisor, then Finance Manager. |
| 2 | Standard Claim | No condition, applies to all other reimbursements | Supervisor. |
The high amount rule must be above the standard rule. The system checks rules by priority order and uses the first matching rule.
How the example works:
| Submitted Claim | Result |
|---|---|
| Rp 750.000 | The high amount rule does not match. The standard rule is used. |
| Rp 1.500.000 | The high amount rule matches. Supervisor and Finance Manager must approve. |
6. Rule Priority
Priority inside the Approval Rules tab controls which approval rule is evaluated first for this form. This is different from form priority in the reimbursement form list.
Important behavior:
- The system checks rules from top to bottom.
- Only the first matching rule is used.
- After a rule matches, the system does not continue to the next rule.
- If no active rule matches, the reimbursement does not require approval and moves forward as approved.
Use priority carefully. Put the most specific rule first and the general fallback rule last.
Common setup pattern:
| Priority | Rule Type |
|---|---|
| Top | Specific rules, such as high amount or special project rules. |
| Middle | Position or custom field rules. |
| Bottom | General fallback rule for all remaining reimbursements. |
Example:
| Rule Order | Condition | What Happens |
|---|---|---|
| 1 | Amount greater than Rp 1.000.000 | Used only for high amount reimbursements. If it matches, lower rules are ignored. |
| 2 | No condition | Used as the fallback for all reimbursements that did not match rule 1. |
If you remove the fallback rule and a reimbursement does not match any other rule, the document will not wait for approval. Use this only when that behavior is intentional.
7. Active, Inactive, And Delete Behavior
A reimbursement form can be active or inactive.
| Status | Behavior |
|---|---|
| Active | Employees with access can use the form for new reimbursements. |
| Inactive | The form is hidden from new submissions but remains available for historical documents. |
Use inactive status when a form should no longer be used but already has reimbursement history.
Delete is only appropriate when the form has not been used and has no blocking configuration. If a form already has reimbursement documents or approval rules, deactivate it instead of deleting it.
8. Recommended Checklist
Before employees start using a reimbursement form, check the following:
- The form name and description are clear.
- The form is active.
- The correct roles are selected in access rights.
- Required custom fields are attached to the form.
- Attachment requirement matches company policy.
- Document numbering preview is correct.
- Instructions are enabled if employees need guidance.
- Approval rules have a clear fallback rule.
- Supervisor or PIC-based rules have valid position PIC assignments.
- A sample reimbursement has been submitted and routed to the expected approver.
Common Problems
| Problem | What To Check |
|---|---|
| Employees cannot see the form. | Check whether the form is active and whether the employee's role is included in access rights. |
| A required field does not appear. | Check whether the custom field is active and attached to the form. |
| The reimbursement number is wrong. | Check prefix, suffix, next number, number length, and reset setting. |
| Approval goes to the wrong person. | Check the employee's position, position PIC assignments, and approval rule order. |
| No approval rule is selected. | Add a fallback rule with no conditions so every reimbursement has an approval path. |
| The form cannot be deleted. | The form may already be used by reimbursements or approval rules. Deactivate it instead. |